With transactions live, you may have heard the term “Cold Wallet” mentioned in Chia Forums. This term means having a wallet that is not connected to the internet. If you are farming Chia and you can see your XCH balance in the Chia Wallet Client matches the balance on the wallet tab, then you have a “Hot Wallet”. This wallet is connected to the internet. From a security point of view, this is the same thing as leaving your computer on 24/7 while logged into your bank account. As long as no one has access to your machine, your money is safe. As you can probably see, no one would leave their computer on 24/7 while logged into a bank account.
- Официальный сайт Chia:
With the bug that brought down the network on May 9th and with the sabotaged Chia GitHub wiki page on May 10th, I’ve seen people talking about getting hacked or someone hacking the network. This is a real issue when dealing with crypto. There are many examples of people losing their crypto due to installing things on their computer. The Cold Wallet is a way to protect yourself from losing all your Chia due to your farming machine getting hacked. In this post, I will guide you through the process of
- Creating a new wallet
- Creating transactions to move the XCH
- Removing and Restoring a wallet
There are many different ways to create a Cold Wallet. This way is the simplest from a Windows perspective without having to use special software or using a second PC. Technically Linux and Mac users can also use this since its only using the Chia Client, but I have not tested it on those operating systems.
An additional note: This process took more than a day because syncing the new wallet is slow. I wanted to see the XCH with my own eyes, so I waited for the sync. Also, read through this whole guide so you understand everything before doing anything. Lets begin with the Chia client:
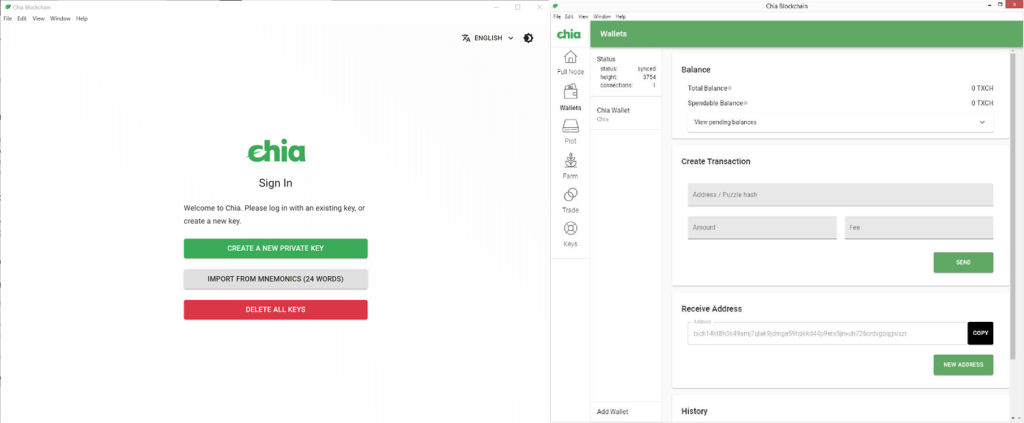
- First, open the Chia Client on your farming machine. If the Chia Client is already open and farming, press the “Keys” tab. This will take you to the screen with your keys. Its the same screen that opens when you first start the Chia Client.
- While on the Keys screen, your farmer will still be farming. Take a good look at this screen. Most people should see just one key on this screen, like this:

The key listed here is the key to your current account. If you do not have a backup of this key, take the time now to do it. Just click the eye and it will show you the 24 mnemonic words. Copy these to a notepad (don’t print it yet) or write these down and keep them in a safe place. The words must be written in order! Also write down the public fingerprint number. Do not save the notepad file to your computer.
3. We need to create another set of keys for the Cold Wallet. Click the green button to generate a new private key.
4. A new 24 word mnemonic phrase will appear. Again, open Notepad, copy these words to it and now print it out (make 2 copies). If you don’t have a printer then you have to handwrite it. Check and double check that every word is spelled correctly and that the order is the same. Order is important. Once you are done, click the green button to proceed.
5. Next, you will be brought to the normal Chia Client Interface. Your node will be farming but your balance will display 0 XCH. This is OK, this is the new wallet. It does not have any Chia in it. Also, your Farmer will still be farming to the old wallet. You are not going to miss chia wins while dealing with your new wallet. Click the wallet tab and scroll down a bit:

On the Wallet screen, you can see that your new wallet is not synced. After a little while they Wallet will begin syncing. I recommend that this sync finish before proceeding with the next step. It will take a day and more for the wallet to sync. The reason in having the new wallet sync is so that you can verify the Chia moves from your old wallet to your new wallet. You can also verify this with , but I want to see it with my own eyes in my own account.
You can leave your farmer like this and it will still send rewards to your first wallet. You can check this by clicking the Farm tab and then the three dots. Click on Manage Farming Rewards. Here, you should see the address to your first wallet. Click Cancel when you are done verifying.
6. After your new wallet is synced, it will say synced for the status. Its time to make the first transfer to the new wallet. Open a notepad and copy the Receive address of the wallet to the notepad. You must use copy/paste. Do not try to hand write it.
7. Next, Click the Keys tab again. Take this opportunity to write the public fingerprint of your new wallet. Once done, click your first key. You should see your XCH balance once it activates. Go ahead and click the Wallet tab. You should see not synced. After some time it will start syncing again. Wait until it completes, it should not take long, hopefully
8. Once the old wallet is synced, we’ll start with our first transfer. The first transfer will be small. This is to make sure that the Chia goes to the correct location:

Look at the Create Transaction area, it is not that descriptive so here is an explanation of each field:
- Address / Puzzle hash – The is where you put the address of where you want your transaction to go. There are two ways to do this. With a Wallet receive address or with a puzzle hash. The Wallet receive address is understandable, but what is a puzzle hash? the simplest way to describe it is: A puzzle hash determines how a coin can be spent.
- Amount – This is where you put in the amount of chia you want to send. This field is in XCH. If you put a “2” in this field you will send 2 XCH. Remember that the smallest amount of Chia that you can have is one trillionth of a Chia (also known as 1 mojo). It looks like this: 0.000000000001. That’s 11 zero’s after the decimal.
- Fee – This is where the fee will go. It is also in XCH. Right now, you do not need to put in any fee because there is not a huge demand on the network. Transactions are processed every 10 seconds and a block can only hold a finite amount of transactions. Once transactions become numerous enough that there is a large queue, then fees become important. The fee takes your transaction towards the top of the list to get executed.
Now we will do our first test transaction. Copy the receive address from your notepad and paste it into the Address/Puzzle hash field. Next, the Amount of XCH we want to transfer is 0.001 for this test. For the fee, we can put 0 fee since there are not that many transactions happening. If everything looks right, click the Green Send button. You should see a success message:

Now if you look at the Wallet Balance you will see that the Spendable Balance is 1.75 or 0.25 less than the Total Balance. This is because the coins that you farmed were given in two payments, a 1.75 and a 0.25 transaction to add to the 2 XCH. To spend XCH, you must send one of these “payments” out and get change back. Almost like spending a dollar or euro and waiting for change from the cashier. After a few minutes, the transaction will clear and you should have the correct Total Balance. For example, if you had 2 XCH before the transaction, the total balance should read 1.999 XCH.
9. Click on the Keys tab again and select the new key you made. Click on the Wallet Tab and wait for it to sync again. Once it is synced, the Total Balance should read 0.001 XCH. If it does not read 0.001 XCH do not proceed. Wait more time for it to come in. If it does not come in after 15-30 minutes, something went wrong or you sent it to the wrong wallet. You will need to retrace your steps to see what went wrong. If the Total Balance is 0.001 XCH then proceed.

10. Click the Keys tab one more time and switch back to your old wallet. Let the Chia Client load.
11. Ok, we will now practice an account recovery. Please, do this next step very, very carefully. If you delete the wrong key, you could lose your whole farm if you wrote down the 24 mnemonic incorrectly. There is no coming back from that. You will be back to square one!

Click on the Keys tab again. Once there, you will delete the key for the new wallet you made. It should be the second key on the list. Reference the public fingerprints you wrote down if you are unsure. Click on the trash can icon to delete it. You will then see a pop up as a final warning that you are about to delete it. Make sure you have your keys printed or written down! Click the Delete button.

Now click the remaining key and make sure your farm comes back normally.
12. We will now restore the new account that you just deleted. Go ahead and click the Keys tab again. Then, click Import From Mnemonics (24 words):

Go ahead and enter all 24 words. Once complete, click the Green button. You will then be presented with another import screen to restore metadata from colored coins or other smart wallets. Currently, those features are not implemented by anybody yet, but in the future, this is where you can restore that data. Click Safe to Skip.

Wait for the interface to load. If the interface doesn’t load, then there is a problem with the 24 words. Retrace your steps to see what went wrong. Once loaded, click the Wallet tab. You should see your balance of 0.001 XCH here. You did it! You now know how to recover your account from the 24 mnemonic phrase.
13. For the final step, we can now transfer all XCH to the new wallet. Go ahead and repeat Step 8. You will probably have to wait around 10-20 minutes for the old wallet to sync again. This time, instead of 0.001 XCH, put in the remaining balance of your account. Remember to copy and paste the new wallet’s receive address! Don’t hand type it!.
14. Once the transfer is sent and you are waiting, go ahead and click the Farm tab and then the three dots at the top right. Click Manage Farming Rewards. Go ahead and Update the receive address to the new wallet that you create. Then click Save. Open the Manage Farming Rewards window again and verify that it saved.
15. Click the Keys tab again and click on the New wallet key. Click the Wallet tab and make sure that your transfer went through. It will take a few minutes for this to update. Once you see the transfer has made it, your cold wallet is now complete.
16. The last step is to click the Keys tab again and delete the new wallet like you did before. Close notepad and don’t save it. You now have your printed 24 mnemonics that you have verified works when you import it.
17 Click the key for you old wallet and resume farming. If you are curious and click the Manage Farming Rewards button again, it will take 15-30 seconds to load. This time, it will display a different message:

A caution now appears in this window. This caution is OK as long as the reward addresses are the correct ones that you put in there.
Phew! That was a long post. As I said before, there are many ways to make a cold wallet. This is just the simplest way I could come up with. If you feel more comfortable using a 2nd PC, you can do that to. I hope this helps you on your farming journey.
An additional note, the 24 mnemonic phrase you have right now is printed on two pieces of paper. Make sure to store these in different safe locations. Paper burns, so preferably a tiny fireproof safe at your home and the other at a deposit box in a Bank. There are various products out there for sale where you can stamp your 24 words into metal. I like this idea because the metal itself is a fire resistant and stamping metal is not easily erased like ink.
I was lucky to win chia recently with the cold wallet setup and it worked but there are differences. The GUI will no longer report any new XCH because it doesn’t have the cold wallet keys. To verify any new wins, you have to use to find out your balance. Use their search function and put in the cold wallet address to see the balance.
Read more articles about cryptocurrencies and mining at CRYPTO-WALLETS.ORG.
The Telegram channel about cryptocurrency and mining Bitcoin, Ethereum, Monero and other altcoins:
Wallets for TON. TonKeeper, Tonhub, MyTonWallet, Wallet.TG
Краткий обзор кошельков TON, которые вам необходимы для начала работы с этой новой быстро развивающейся сетью блокчейна! (TonKeeper, Tonhub, MyTonWallet). Кошельки TON разработаны для взаимодействия с реестром блокчейна TON и позволяют пользователям управлять своими активами и совершать транзакции в сети. Кошельки TON упаковывают сложные инструкции в простые щелчки, позволяя любому человеку использовать и исследовать сеть, сохраняя при этом полное владение своими активами в блокчейне.
Overview of decentralized crypto platforms Waves
The Waves team is developing tools to create a decentralized technology segment that will become the basis of Web 3.0 – the digital landscape of the future.
Review of the best wallets for Litecoin (LTC)
Like Bitcoin, the Litecoin cryptocurrency is rapidly gaining momentum and becoming quite a sought-after digital asset around the world.


