Monero GUI Wallet – This is a wallet with a graphical interface that provides a pleasant user interface that is adaptable for all types of users, but is especially recommended for less technical people who want to quickly send, receive and store XMR securely.
- Simple mode. Designed for less technical users who want to use Monero only in the simplest and fastest way. Open the wallet, automatically connect to the remote host, send / receive XMR, done!
- Advanced mode. With all the advanced features you may need. Ideal for experienced Monero users who prefer full control over their wallet and host
- Seller Page Get XMR for your business, easy and compatible with hardware wallets like Trezor and Ledger
- built-in conversion to the application. No more checking the cost of your XMR online
- Blockchain pruning. Not enough disk space? Just use the shortcut to download only 1/3 of the blockchain
- 30+ available languages
Download Monero GUI Wallet:
User Guides:
Windows Preparation
If you are on Windows:
- Make sure that your antivirus does not block the program.
A miner is included in the Monero GUI software and, as a result, most anti virus software flags the Monero GUI files as malware and subsequently quarantines them. Fortunately, however, there’s a fairly trivial work around you can use. That is:
- Create a new directory / folder.
- Open your AV software.
- Add an exception for the newly created directory / folder. Put differently, you have to whitelist the newly created directory / folder.
- Extract the .zip file (in case of Windows) or the .tar.bz2 file (in case of Linux or Mac OS X) to the whitelisted directory / folder. Note: if you’re using Windows and did not install custom anti virus software, Windows Defender is, most likely, acting as active anti virus software.
- The first time you start the wallet you must give permission to connect to the network via a pop-up. Check the appropriate boxes and click
Allow access.
Shortcuts
Some shortcuts are available to make the user experience with the GUI easier:
On all operating systems:
Press Ctrl to view each page shortcut. Press ctrl+"shortcut" to go to that page
On Linux/Windows:ctrl + tab -> go to the next pagectrl + shift + tab -> go to the previous page
On macOS:cmd + tab -> go to the next pagecmd + shift + tab -> go to the previous page
Welcome MONERO GUI WALLET
Extract the package and click on monero-wallet-gui. The following window should open:
Welcome to Monero GUI Wallet.
(1) Language: Click here to open a list of available languages. Select your desired language from the list.
(2) Continue: Click here to continue to the next screen.
If Monero GUI isn’t displaying graphics correctly, you can try starting it in low graphics mode. If you’re using Windows, please open start-low-graphics-mode.bat file located in your Monero GUI folder. You can find it in C:\Program Files\Monero GUI Wallet or you can find a shortcut for it in Start Menu > Monero GUI Wallet > Utilities. If you’re using Linux, please try using the command QMLSCENE_DEVICE=softwarecontext ./monero-wallet-gui. Most macOS users shouldn’t have graphic problems with Monero GUI, since it comes with OpenGL installed.
Choose a Language
You’ll see a list of available languages, click on the one of your choice to change it and continue from the welcome screen. Note: You will be able to change the language later by clicking on the flag in the upper-left corner.
(1) Close: Cancel and return to the previous screen.
Choose wallet mode
This page lets you choose the mode that best suits your accessibility and privacy needs.
Note: Stagenet and Testnnet only supports Advanced mode.
(1) Simple mode: In this mode your wallet will display a simple interface with easy access to basic functionality like sending, receiving, transactions history, address book, accounts, and merchant mode, as well as hardware wallet support. It will connect to a third-party server (a remote node), and it will not start a local node in your computer (the blockchain will not be downloaded). Choose this option if you don’t have enough space to store the blockchain file (at least 90 GB), if you don’t require maximum privacy and you accept the privacy risks of using a remote node to connect to the Monero network.
(2) Simple mode (bootstrap): In this mode your wallet will also display a simple interface with easy access to basic functionality. Additionaly it will start a local node in the background. This local node will start the download of the blockchain file (at least 90 GB), which can take several hours or even days to complete. While the blockchain file is being downloaded, your local node will temporarily connect to a third-party server (a remote node known as bootstrap node), which will allow you to start using Monero immediately. After downloading and synchronizing the blockchain and the wallet, your local node will only temporarily connect to the bootstrap node when your blockchain is not updated. Be aware that using a remote node (including a bootstrap node) to connect to the Monero network may reduce your privacy.
(3) Advanced mode: In this mode your wallet will display all advanced features available, like changing fees/transaction priority, solo mining, message verification, transaction proof/check, offline transaction signing, key images importing, custom remote node (including .onion remote nodes), custom bootstrap node, starting a local node without setting a bootstrap node (maximum privacy), changing blockchain location, and daemon log. In this mode you can choose if you want to connect to the Monero network via a remote node or a local node. If you decide to run a local node, the blockchain file will be downloaded. If you want to start using Monero immediately, you can also set a bootstrap node (remote node) in the Settings > Node page. To achieve maximum privacy in your connection to the Monero network, it’s recommended to avoid using a remote/bootstrap node and instead use advanced mode to start a local node without setting a bootstrap node.
(4) Change language: This will let you choose the language from the startup page (again).
About the Simple/Bootstrap mode
Upon choosing simple mode or bootstrap mode, an acknowledgement page will be shown, explaining the features, behavior, and privacy constraints of the mode.
Please carefully read those informations before accepting the implications of this mode and proceed to the next step.
You must understand the inherent risks of using a remote node for your privacy, and you should avoid using it with large amounts of money. If you connect to a malicious remote node, it could track your IP address, your “restore height” and associated block request data, and send you inaccurate information to learn more about transactions you make.
(1) Region: Choose a region to pick up the remote nodes from. The closer the node is, the better the wallet performance will be.
(2) Acknowledgement: Check This box if you have fully understood the privacy implications of a remote node and agree to weaken your privacy by using it.
Create a Monero Wallet
On this page you can create a new wallet, open an existing wallet, change wallet mode or change choose how to connect to the wallet and to the network:
(1) Create a new wallet: Start the procedure to create a new wallet file. Choose this option if this is your first time using Monero.
(2) Create new wallet from hardware: Create a new wallet file from a hardware wallet device (e.g., Ledger or Trezor).
(3) Open a wallet from file: Choose this option to select a pre-existing wallet file from your computer (with the extension .keys).
(4) Restore wallet from keys or mnemonic seed: Click here if you want to recover a pre-existing wallet using the mnemonic seed or the private keys, creating a new wallet file.
(5) Change wallet mode: Click here to switch between simple, simple (bootstrap), and advanced modes.
Advanced options (requires wallet in advanced mode):
(6) Mainnet: Select this from the dropdown list to use the main Monero network
(7) Testnet: Select this option if you would like to use a development network instead of the main network. Testnet is designed to let developers test new features that are not available on Mainnet or Stagenet.
(8) Stagenet: Select this option if you would like to use a network for staging instead of the main network. Stagenet mimics the features of Mainnet and is designed to let end users test Monero without the risk of losing funds.
(9) Number of KDF rounds: Adjust the number of Key Derivation Function rounds in order to enhance the overall security of the generated keys. Any random large number will increase the security.
Create new XMR wallet
Here you can create a new wallet file:
(1) Wallet name: Give a name for your wallet (in this example testname is used).
(2) Mnemonic seed: Write down your and keep it safe. Your seed is the master key of your wallet, you can use it to recover your funds.
(3) Wallet location: Select the destination folder of the wallet.
Add a password
Add a strong password to protect your wallet. If you lose your password, then only your mnemonic seed can recover your wallet.
Daemon settings
This page will open if your wallet is in advanced mode. Here you can choose if you are going to start a local node or connect to a remote node:
(1) Start node in background: Check this box to start a local node (full node) in the background and download the blockchain.
(2) Blockchain location (optional): To store the blockchain somewhere other than default, enter that location here.
(3) Bootstrap node: Here you can enter the host/IP address and port of a bootstrap node (remote node). Your local node will temporarily connect to this third-party remote node while the blockchain is being downloaded, allowing you to use your wallet immediately. For a list of available remote nodes and info about them, check the section of this guide.
(4) Connect to a remote node: Check this box if you just want to use a remote node without downloading the blockchain. Enter the host/IP address and port of the remote node after checking the box.
Starting a local node (full node)
If you have selected to start a local node, every time you open your wallet you will see this pop up window:
It has a countdown that allows you to change some settings before your wallet connects to the local node. If you don’t want to change any setting, just let the countdown finish and your local node will be started automatically.
Create new wallet from hardware
Monero GUI currently supports the hardware wallet models Ledger Nano S/X and Trezor Model T.
How hardware wallets work with Monero GUI
- The main function of your hardware wallet is to store your recovery seed in a device that never connects to the internet.
- Your device has a single recovery seed, which is used to create Bitcoin and altcoins wallets, like Monero.
- The recovery seed stored in your device will be used to generate two Monero private keys: a view key and a spend key.
- Your private view key is exported from your hardware wallet device to the Monero GUI wallet.
- Your private spend key never leaves your hardware wallet device. It is required to sign transactions.
- How it works: 1) Monero GUI creates an unsigned transaction; 2) The unsigned transaction is sent to your hardware wallet device; 3) Your device asks if you want to confirm the transaction (sign the transaction with your private spend key); 4) After confirmed, the signed transaction is sent back to Monero GUI; 5) Monero GUI transmits the signed transaction to the Monero network
Prepare your device
If you are using a Ledger Nano S/X, please make sure: + Your device is plugged in and unlocked + Your device has already been initialized before (your device already has a recovery seed) + Your device has the most recent firmware version (available in Manager section of Ledger Live desktop app) (see instructions for /)
- Your device has the Monero app installed (available in Ledger Live desktop app) + Your device is running the Monero app + Your computer has no other cryptocurrency wallet running in the background, like Ledger Live
If you are using a Trezor Model T, please make sure: + Your device is plugged in and unlocked + Your device has already been initialized before (your device already has a recovery seed) + Your device has the most recent firmware version (available in Trezor Wallet) () + Your computer has no other cryptocurrency wallet running in the background, like Trezor Wallet
Create a wallet from your hardware wallet device
On this page you can create a new Monero wallet file from your hardware wallet device. This wallet file will be stored in your computer and, every time you open it, Monero GUI will ask you to connect and unlock your hardware wallet. If your device is using a passphrase, your passphrase will also be requested.
(1) Wallet name: Give a name for your wallet file (in this example ledger-test is used).
(2) Wallet location: Select the destination folder of the wallet file.
(3) Create a new wallet from device: Select this option if this is the first time you use a hardware wallet.
(4) Restore a wallet from device: Choose this option if you already had a hardware wallet and want to restore it.
Creation Date or Restore height (optional): Restore only: If you know the date or block height that your wallet was created at, you can specify it here so the wallet doesn’t have to scan the entire blockchain looking for your funds. For example, if your first transaction was included on 2017-07-08 in block 1350000, you should put the previous day date (e.g. 2017-07-06) or a slightly lower height (e.g. 1330000) so the wallet will start scanning from there, saving you some time. More information about restore height on .
(5) Subaddress lookahead (optional): pregenerate a number of accounts with a number of subaddresses each.
(6) Device name: Select the hardware wallet you want to use. Monero GUI currently supports the hardware wallet models Ledger Nano S/X and Trezor Model T.
Ledger troubleshooting
- If you can’t connect to your Ledger, try restarting your computer, using a different USB cable, changing the USB port, or connecting to a different computer. Avoid using USB hubs.
- If your Monero GUI wallet is slow while using Ledger, make sure you’re allowing your Ledger device to export the private view key to your computer. You should only export the private view key when using official Monero software.
- Step by step guide for all operating systems (StackExchange):
Trezor troubleshooting
- If you can’t connect to your Trezor, try restarting your computer, using a different USB cable, changing the USB port, or connecting to a different computer. Avoid using USB hubs.
- If you still can’t connect, try installing . It’s usually not necessary to install Trezor Bridge, but some systems may require it to communicate with Trezor.
- Step by step guide for all operating systems (StackExchange):
Add a password
Add a strong password to protect your wallet file. If you forget the password of a wallet created from your hardware wallet, you will be able to create another wallet from your hardware device.
Daemon settings (Advanced mode)
Here you can choose if you are going to run a full node or use a remote one:
(1) Start node in background: Check this box to run a full node and begin blockchain sync.
(2) Blockchain location (optional): To store the blockchain somewhere other than default, enter that location here.
(3) Bootstrap node: To use a bootstrap node enter the host and port. A bootstrap node allows you to use your wallet while you are downloading the blockchain by connecting to a remote node. For a list of available remote nodes and info about them, check the section of this guide.
(4) Connect to a remote node: Check this box if you want to use only a remote node without downloading the blockchain. You will need to put the host and port of the remote node after checking the box.
Starting a local node (full node)
If you have selected to start a local node, every time you open your wallet you will see this pop up window:
It has a countdown that allows you to change some settings before your wallet connects to the local node. If you don’t want to change any setting, just let the countdown finish and your local node will be started automatically.
Receive and Send Monero with your hardware wallet
When using Monero GUI with a hardware wallet, every time you click on the send button, you will first have to confirm your transaction in your hardware wallet device, and then you will have to confirm it a second time in Monero GUI.
Sometimes you will also have to confirm in your device that you accept exporting the private view key (Ledger and Trezor) and key images (Trezor).
When using a hardware wallet, Monero GUI Receive page will display an additional “Show on device” button. By clicking this button, the address being displayed in Monero GUI should be displayed in your device. If both addresses match, you can be sure that the receiving address being displayed in Monero GUI was indeed created by your hardware wallet, and that it has not been changed by a virus infecting your computer.
Restore wallet from keys or mnemonic seed
Restoring from seed
Restoring from your mnemonic seed is the easiest way to recover your wallet. You need to put the following information:
(1) Wallet name: Give a name for your wallet (in this example testname is used).
(2) Mnemonic seed: Paste your seed made of 25 (or 24) words.
(3) Creation Date or Restore height (optional): If you know the date or block height that your wallet was created at, you can specify it here so the wallet doesn’t have to scan the entire blockchain looking for your funds. For example, if your first transaction was included on 2017-07-08 in block 1350000, you should put the previous day date (e.g. 2017-07-06) or a slightly lower height (e.g. 1330000) so the wallet will start scanning from there, saving you some time. More information about restore height on .
(4) Wallet location: Select the destination folder of the wallet.
A detailed guide is available on getmonero.org:
Restoring from keys
Restoring from keys is quite easy and can be extremely useful, especially if you are moving your wallet from an online service like MyMonero. You need to put the following information:
(1) Wallet name: Give a name for your wallet (in this example testname is used).
(2) Account address: The address of the wallet you are recovering.
(3) View key: Your private view key (needed to be able to check your funds).
(4) Spend key: Your private spend key (needed to spend your funds).
(5) Creation Date or Restore height (optional): If you know the date or block height that your wallet was created at, you can specify it here so the wallet doesn’t have to scan the entire blockchain looking for your funds. For example, if your first transaction was included on 2017-07-08 in block 1350000, you should put the previous day date (e.g. 2017-07-06) or a slightly lower height (e.g. 1330000) so the wallet will start scanning from there, saving you some time. More information about restore height on .
(6) Wallet location: Select the destination folder of the wallet.
When everything is ready click the right arrow and then the Use Monero button.
A detailed guide is available on getmonero.org:
Open a wallet from file
After clicking this option a window will pop up. Navigate to your file with the extension .keys, select it and click the right arrow.
Synchronization
After creating and opening a wallet file, Monero GUI will start synchronizing. This process is required to know your balance, receive and send transactions.
Monero GUI’s synchronization is composed of two parts: 1) Daemon synchronization 2) Wallet synchronization
Daemon synchronization
Monero GUI wallet uses a daemon (monerod), which is a program running in the background that synchronizes with the Monero network to scan for incoming transactions and to send new transactions.
Your daemon must have access to the Monero blockchain, which is a very large file (more than 100 GB) which contains all transactions that have been made since the beginning of Monero in 2014. The blockchain file can be stored in your computer (if your daemon run a local node) or in a computer of another person (if your daemon connect to a third-party remote node). If you decide to run a local node, you can run it as a full node, that has the whole blockchain file (more than 100 GB) or as a prunned node, that has a light version of the blockchain file (1/3 of the size, aproximatedly 35 GB).
The best way to contribute to Monero’s security and decentralization is running a local node as a full node. Even though local nodes running as pruned nodes also contribute to Monero’s security and decentralization, they are still less comprehensive than full nodes. However, pruned nodes are better for your privacy and to the Monero network than connecting to someone else’s remote node.
Daemon synchronization with local node
If you run a local node as a full node (requires wallet in “advanced mode” with local node selected in Setings > Node), your wallet daemon will download the blockchain file into your computer. Since it’s a very large file (more than 100 GB), this can take a long time, even days, depending on your internet speed and storage unit (HDD or SSD).
If you run a local node as a full node with a bootstrap node (requires wallet in “simple mode (bootstrap)”), your wallet daemon will also download the blockchain file into your computer, but it will connect to a remote node (a bootstrap node) while the download is not finished, allowing you to immediately send/receive a transaction.
If you want to run a local node as a pruned node, see .
Daemon synchronization with remote node
If you want to connect to a remote node (requires wallet in “simple mode” or in “advanced mode” with remote node selected in Settings > Node), your daemon will use the blockchain of a third party remote note. Since it will not have to download the whole blockchain file, your synchronization will be faster.
Block height
After your daemon and your wallet are synchronized, your daemon progress bar will display “Daemon is synchronized (number)”, see below:
This number between parenthesis is the current block height, which is the latest block received by your daemon. In average, this number wil increase +1 every 2 minutes, when a new block is found by a miner.
Wallet synchronization
After synchronizing the daemon, your wallet will scan the blockchain file, searching for past transactions. Once a previous transaction is detected and retrieved by your wallet, your balance and your transaction history will be updated.
Since all transactions are encrypted in Monero, your wallet will have to decrypt a lot of transactions. This process places very high demands on your computer’s resources, including CPU processing and many readings and writings in your hard disk. Depending on your system configuration, this can take a long time, even days, so please be patient. Be aware that the synchronization speed is not always constant. Some blocks can have more transactions and/or use different technologies, therefore they may take longer to verify.
Wallet restore height
The wallet restore height is the block number (block height) where your wallet will start searching for transactions. This number should be a block height before the block that included your first incoming transaction. For example, if your wallet received Monero for the first time in 2020-09-20, your wallet restore height must be a block number before the block height of this date. Monero wallets usually ask you to write down your wallet restore height together with your restore seed when you are creating a wallet. You should never set your wallet restore height to 0, otherwise your wallet will scan all transactions in the whole blockchain (since 2014), which takes a lot of time.
How to change Wallet restore height / Wrong or zero balance after synchronizing
In order to see the correct balance, your wallet must be fully synchronized AND using a correct restore height. If your wallet is fully synchronized but your balance is still wrong, you’re probably using a wallet restore height that is higher than the block height of your first incoming transaction. To solve this, you have to set a new wallet restore height. Go to Settings > Info page, Wallet restore height and click on “(Change)”.
Next, enter a new restore height or an estimate date before your first incoming transaction, and then click on “Ok”.
Your wallet will now rescan the blockchain starting from the new restore height.
How to speed up wallet initial synchronization
Some factors that can increase the speed of your initial synchronization are: * Broadband internet connection * Using a SSD (solid state disk drive) instead of an HDD (hard disk drive) * Having a faster CPU * Connecting to a remote node will avoid downloading the blockchain.
Monero Account
The Account tab provides tool to handle your different Monero accounts within your wallet. Each wallet can have multiple accounts, and each account has its own balance. Also, each account can have multiple subaddresses associated with it. For convenience sake, the account address is considered the first address (or subaddress) generated for an account. Since accounts and subaddresses are deterministically derived from the mnemonic seed, you only need to know the seed in order to restore the account/subaddress structure when restoring a wallet (although any labels you assign to the accounts/subaddresses will need to be added again, since they are stored in your wallet file, and not in your mnemonic seed, neither on the blockchain).
(1) Balance All: Let you see the sum of all your accounts balances, unlocked or not.
(2) Accounts: This is the list of all accounts already generated on your wallet and their corresponding account addresses.
(3) Create new account: Click on this button to create a new account and set its optional label.
You can change the current account by simply clicking on it on the list.
Each of your accounts are filled with their own informations:
(4) Label: A name or description of the account for convenience.
(5) Account Address: This is the public address you should give to the sender when you want to receive money in this account. In account #0, it starts with 4 and corresponds to the wallet’s primary address. In the remaining accounts it corresponds to the account’s first subaddress and therefore starts with 8.
(6) Balance: The account total balance. It cumulates the main address and all subaddresses for this account. Note: Subaddresses are managed in the screen
(7) Edit Label: Click on this button to edit this account label.
(8) Copy Address to Clipboard: Click on this button to copy this account address to the clipboard.
Send Monero
The Send tab provides tools for creating outgoing transactions.
(1) Address: This is where you enter the destination address of the transaction. You can either enter a Monero address (a primary address starting with 4… or a subadress starting with 8…) or an OpenAlias address (see for more information about OpenAlias). Best practice is to copy and paste the address to prevent errors. Since there are malwares that may replace the address of your clipboard with an address associated with hackers, you should always verify the destination address after pasting it. Click on the Address book button on the right side to import an address from the address book of your wallet.
(2) Amount: This is how much Monero (XMR) you want to send. Click on the All button on the right side to create a transaction spending all the spendable (unlocked) balance available in your selected account. If you have enabled the option to display the balance in other currencies in Settings > Interface, your wallet will also display the amount converted in fiat currency.
(3) Transaction priority (requires wallet in advanced mode): This is the priority level your transaction will receive in the pool of transactions waiting to be confirmed. The higher the transaction priority, the faster your transaction will be confirmed (included in a block), but the higher you will pay in transaction fee.
Currently staying with the default or the slow option is likely to get you into the next block.
(4) Description (optional): Here you can add some information regarding your transaction for future reference. This function is for your record keeping only. The description text will be stored in your wallet file and only you will be able to see it. It will not be be sent to the receiver, nor stored on the blockchain.
Advanced options (requires wallet in advanced mode)
(5) Key images: This section allows you to export the key images from your cold wallet into a file, as well as to import this key images file into your view-only wallet. When your view-only wallet has the key images for all outputs, it can display the true balance. In order to import the key images into your view-only wallet, you must use a local node or be connected to a trusted remote node (you can set a trusted remote node in “Settings” > “Node” page). Click on the question mark icon to see step-by-step instructions.
(6) Offline transaction signing: This feature refers to the practice of keeping the private keys in a cold wallet, which is a wallet installed in an offline (“cold”) device. Since the offline wallet never gets connected to the internet, its stored private keys remain secure. The cold wallet is only used to sign individual transactions, which are later sent to the Monero network using a view-only wallet. Click on the question mark icon to see step-by-step instructions.
(7) Sweep unmixable: This allows you to get rid of outputs which have strange amounts like 0.000006839355 and can’t be spent without combining them with another output.
Most users will never need to use this feature.
Address Book
The Address book tab lets you save the name and Monero address of contacts that you frequently transact with. This is a convenient place to copy addresses from when creating transactions.
Receive Monero
The Receive tab provides tools for generating subaddresses.
(1) Addresses: This list includes your wallet’s primary address (starting with 4…) and all its subaddresses (starting with 8…).
(2) Create new address: This button allows you to create as many new subaddresses as you wish. Since Monero is private, you don’t need to create a new subaddress every time you receive a transaction. However, to avoid off-chain linking, it’s recommended that you create a new subaddress for every person, company or exchange you will receive Monero from. Learn more about .
(3) Set Label: Click on this button to set this subaddress label. You can use this label to store the person, company or exchange you gave this subaddress.
(4) QR code: This is a QR code that has your selected address embedded into it. It can be used as a way to give others your Monero address by scanning the code.
(5) Save: Click here to save the QR code as a png image.
(6) Copy: Click here to copy the QR code corresponding URL formated as *monero:
-
Merchant mode
The Merchant mode offers vendors a simple Point of Sale (PoS) to receive Monero (XMR). It allows you to manually generate payment requests, and to monitor incoming transactions (unconfirmed and confirmed transactions).
(1) QR code: This is a QR code that contains your currently selected address, and, optionally, the amount to receive. Display this QR code to your customers, so they can scan it and pay using their mobile wallets.
(2) Amount to receive (XMR): This is used to create a payment request. Enter the amount of Monero (XMR) you would like to receive, and the QR code will be updated.
(3) Payment URL: This is the URL corresponding to the address and amount you have chosen. It could be copied by clicking on it and sent to a customer.
(4) Enable sales tracker: If you tick this box, you’ll see a list of incoming transactions. By enabling sales tracker, the merchant page will automatically scan the blockchain and the tx pool for incoming transactions using the QR code. It’s up to you whether to accept unconfirmed transactions or not. It is likely they’ll be confirmed in short order, but there is still a possibility they might not, so for larger values you may want to wait for one or more confirmation(s).
(5) Sales: Those are the transactions currently seen on the blockchain and the transaction pool, with associated confirmations.
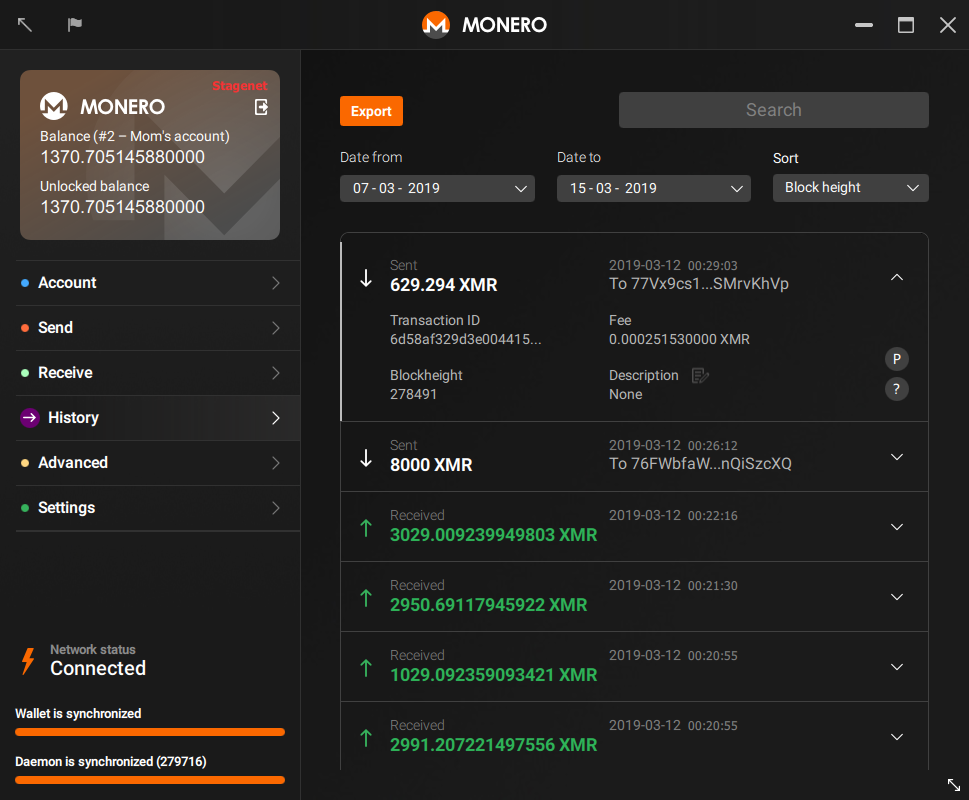
Transactions History
The Transactions tab let you walk through the transactions sent and received on the currently selected account of your Monero wallet.
(1) Search: Quickly filter out transactions from the list searching by transaction ID, destination address, description, amount or blockheight (number of the block in which the transaction was mined).
(2) Sort & Filter: Here you can filter out transactions between specific dates, or sort them by blockheight, date or amount.
(3) Transaction list: This area displays the sent and received transactions of the currently selected account.
For incoming transactions you will see: Transaction type (Received), Amount, In (your wallet’s address which received this transaction and its label), and Date. Because of Monero’s privacy-preserving technology, it’s not possible to know the sender’s address. Therefore, in order to know from who you are receiving each transaction, you should always remember to create and give a new subaddress for every person you will receive Monero from.
For outgoing transactions you will see: Transaction type (Sent), Amount, To (the destination address or its Address Book name), and Date.
By clicking on a transaction, you will see the following additional information: Fee (outgoing transactions), Confirmations, Description (optional), Transaction ID, Transaction key, and Blockheight. The transaction ID, the transaction key and the destination address can be used to prove that a payment was done in case of a dispute. The transaction keys and the descriptions (notes) are stored in the cache of your local wallet, therefore they cannot be recovered from the blockchain.
(4) Details: Clicking here will show you the following transaction details, when available: Transaction ID, Date, Amount, Address, Payment ID, Integrated address, Transaction key, Description (note), Destinations and Rings.
(5) Prove payment (P): Clicking here will generate a payment proof, which you can use, in case of a dispute, to prove that you made a payment. More details on proving payments can be found
(6) Set description: Click on this icon to set a new description or edit an existing one.
(7) Advanced options: Lets you choose in which format the date should be displayed.
Advanced Features
Solo mining
The Mining tab provides a one click CPU miner that is embedded into the GUI.
(1) CPU threads: Number of CPU threads to use for mining.
(2) threads auto-configuration: Set automatically the number of threads either to the recommended number, or to the max number.
(3) Background mining: Check this box to enable experimental background mining. This should allow you to use your computer normally while mining.
(4) Start mining: Start the miner.
(5) Stop mining: Stop the miner.
(6) Status: Indicates the mining state and hashrate.
Prove – Check
The Prove/check tab provides tools for proving a payment or validating proof of a payment. This is necessary with Monero because these details are not available on the blockchain.
Prove Transaction
This will generate a proof that you made a payment to a certain address. You need to put the following information:
(1) Transaction ID: This is the ID of the payment you are creating proof for. You can find the transaction details by selecting the History tab from the left menu.
(2) Address: This is the address you are proving payment to.
(3) Message (optional): This an optional message that will be signed with the transaction details. If you choose to include a message then the other party must also include the exact same message in order to verify your proof.
(4) Generate: Click here once you’ve entered all the details to generate your proof.
A detailed guide is available on getmonero.org:
Check Transaction
This will verify that a payment was made. You need to put the following information:
(1) Transaction ID: This is the ID of the payment you are attempting to verify.
(2) Address: This is the receiving address of the payment you are attempting to verify.
(3) Message (optional): This is the optional message that may have been included with the proof.
(4) Signature: This is the signature generated to prove payment.
(5) Check: Click here once you’ve entered all the details to check that the transaction proof is valid.
Shared RingDB
This is an advanced tool that can be used to improve the privacy of ring signatures. The outputs used in ring signatures can be adapted to mitigate the privacy loss when using a key-reusing fork or to avoid outputs that could not be spent in this transaction.
(1) Mark as spent filename: This tool will mark outputs that are known to be spent. After running monero-blockchain-mark-spent-outputs, import the resulting file to avoid using these outputs as decoys in constructed ring signatures. This file is stored in the .shared-ringdb folder by default.
(2) Mark as spent output: This will mark or unmark as spent a chosen single output. Outputs are represented by 64-character strings. The outputs added in this field will not be used as decoys in constructed ring signatures. Unmarked outputs may (but will not necessarily) by used as decoys.
(3) Key image input: Add the key image that was used on the key-reusing fork.
(4) Get ring: Press the “Get Ring” button to get the ring members for the given key image in 3.
(5) Set ring: Press the “Set Ring” button to set the ring members for a transaction. Copy the ring members from 4 to get those for the key image, or manually type in your own.
(6) Intent to spend: Select this if you are certain that you will spend Monero on a key-reusing fork. This will aggressively modify the input selection algorithm to give you the greatest plausible deniability.
(7) Possibility to spend: Select this if you may spend Monero on a key-reusing fork. This will modify the input selection algorithm. Uncheck this only if you are certain you will not use a key-reusing fork.
(8) Relative: When selected, the offsets are encoded relative to the previous, as opposed to absolute (transactions use relative offsets).
(9) Segregation height: The block height at which the key-reusing fork splits.
Sign – verify Message
The Sign/verify tab provides tools for signing a message or file with your private key or verifying the authenticity of a singed message or file.
Sign
(1) Message: This is where you can enter a message to be signed.
(2) Signature: This is where your unique signature will appear once you click the Sign button. This is linked to your private key and the message you entered. It will be given as proof along with the message which was signed.
Verify
(3) Verify message: This is where you will put a message that has been signed.
(4) Address: This is where you will enter the public Monero address of the signer.
(5) Signature: This is where you will enter the signature you are verifying. Once all the required information has been entered click the Verify button. A pop-up will tell you if the signature is valid.
Sign – verify File
The Sign/verify tab provides tools for signing a message or file with your private key or verifying the authenticity of a singed message or file.
Sign
(1) File: This is where you can choose a file to be signed. Click Browse to navigate the file system.
(2) Signature: This is where your unique signature will appear once you click the Sign button. This is linked to your private key and the file you entered. It will be given as proof along with the file which was signed.
Verify
(3) File: This is where you enter the path to a file that has been signed. Click Browse to navigate the file system.
(4) Address: This is where you will enter the public Monero address of the signer.
(5) Signature: This is where you will enter the signature you are verifying. Once all the required information has been entered click the Verify button. A pop-up will tell you if the signature is valid.
Settings
The Settings tab provides tools for customizing configuration options.
Wallet
(1) Close this wallet: Click here to safely close the current wallet and open the main menu.
(2) Create a view-only wallet: Click here to generate a view-only (or audit) wallet file, which is capable to see all incoming transactions. In order to display the real balance, you must also import the key images from your normal wallet into your view-only wallet. The view-only wallet will be created with the same password as the current wallet. See this for more information.
(3) Show seed & keys: This button will redirect you to the tab.
(4) Rescan wallet balance: Click here to rescan all spent outputs from your wallet, updating your wallet balance. If your balance is still incorrect, you probably will have to resync your wallet after changing the wallet restore height to a restore height before the height of the first transaction to your wallet. To do this, go to the Settings > Info page, Wallet restore height, and click on the (Change) link.
(5) Change wallet password: Click here to change the password of your wallet file.
(6) Enter merchant mode: Click here to open Monero GUI’s business-friendly mode.
Interface MONERO GUI WALLET
The Interface tab is where you can adjust appearance and security settings of the GUI wallet. The options are:
(1) Custom decorations: Switch custom window decorations.
(2) Check for updates periodically: Enable this option if you want your wallet to periodically check if a new version is available.
(3) Hide balance: Will display your balance as ?.?? in the balance card. It is a useful privacy feature if you are running your wallet in a public place, as a point of sales system, or if you have to take a screenshot or record your screen to someone.
(4) Light theme: Switch between light and dark themes.
(5) Ask for password before sending a transaction: Disable this option if you don’t want to type your password every time a transaction is sent. This option is enabled by default.
(6) Autosave: When enabled, your wallet file will be saved automatically, every 10 minutes (default) or at an interval of your choice. This option is enabled by default.
(7) Lock wallet on inactivity: Set this to automatically lock your wallet after N minutes of inactivity. This ensures no one is able to use your wallet while you are away from keyboard.
(8) Enable displaying balance in other currencies: Gives you the possibility to also display your balance, the transaction amount and transaction fee in other currencies. You can select the price source and the currency you prefer (currently only USD and EUR are supported).
Local Node
(1) Start/Stop Local Node: Depending on its current state, either start or stop the local node.
(2) Blockchain location: Manually enter a non-default path to the blockchain, or click change to choose a new path.
(3) Startup flags: When using a local node, this will be where you enter additional command line options.
(4) Bootstrap Address: Enter the hostname or IP address of the bootstrap remote node. See section for a brief explanation of what a bootstrap node is.
(5) Bootstrap Port: Enter the port of the bootstrap remote node.
Remote Node
Use a remote node, do not download the blockchain. Check the of this guide.
(1) Address: Enter the hostname or IP address of the remote node.
(2) Port: Enter the port of the remote node.
(3) Daemon Username: Enter a username in case authentication to the remote node is required.
(4) Daemon Password: Enter a password in case authentication to the remote node is required.
(5) Trusted Daemon: By default, data requests to remote nodes are obfuscated, and this process requires more resources. If your remote node is under your control (i.e. a dedicated server of your own) you can mark it trusted so that data requests will not be obfuscated anymore (just like a local node).
Log
(1) Log level: Change the verbosity of the debug logs.
(2) Log categories: Add specific categories to the debug logs.
(3) Daemon log: Real time output of the log.
(4) Command line: Interact with the daemon.
Info
(1) GUI Version: Version of the GUI wallet installed.
(2) Embedded Monero Version: Version of the embedded daemon in use.
(3) Wallet path: Where the wallet is located on your computer.
(4) Wallet restore height: Your wallet synchronization starts at the block defined in wallet restore height. Therefore, you must set the restore height before the height of the first incoming transaction of your wallet. If you click on the (Change) link, you can set a blockheight or a date. After changing it, your wallet will rescan the blockchain starting from the blockheight you set. Note: when you change your wallet’s restore height, you will lose all information that is stored in the wallet software and cannot be recovered from the blockchain, which includes destination addresses, transaction keys, and descriptions (notes).
(5) Wallet log path: Where the logs for this wallet will be saved.
(6) Wallet mode: Display the wallet mode chosen in the .
(7) Graphics mode: Display the graphics mode.
(8) Copy to clipboard: Copy all information to clipboard.
Seed and keys
The Seeds & Keys tab displays your wallets mnemonic seed as well as your secret view key, public view key, secret spend key, and public spend key.
(1) Mnemonic seed: DO NOT share your mnemonic seed with anyone. Store a copy securely. The mnemonic seed is a 25 word phrase that contains all the information needed to view and spend funds. Learn more about .
(2) Wallet restore height. This is the blockheight of the first incoming transaction of your wallet. This information is useful when you restore your wallet, because you will only have to synchronize the blockchain for the period that is needed.
(3) Primary address: This is the main address of your wallet and starts with 4. All other addresses from your wallet are subaddresses, and start with 8.
(4) Secret view key: Secret (private) view keys allows the holder to view your wallets incoming transactions, but not outgoing. It is sometimes useful for auditing purposes to give your secret view key to a third party.
(5) Public view key: The public view key is used for stealth address creation. Learn more about .
(6) Secret spend key: DO NOT share your secret spend key with anyone. The secret (private) spend key is used to sign transactions and should be regarded with the same security as your mnemonic seed.
(7) Public spend key: The public spend key is used by the network to verify the signature of the key image you generate when you make a transaction. This is what prevents double-spends as the network enforces the rule that a key image can be spent only once. Learn more about .
(8) Export Spendable Wallet: DO NOT share your spendable wallet QR code with anyone. This can be used like a mnemonic seed for recovering your wallet. This creates a qrcode that contains all of your keys.
(9) Export View Only Wallet: This creates a QR code that contains only the keys for viewing the transactions that this wallet sends or receives, but cannot create transactions.
Read more articles about cryptocurrencies and mining at CRYPTO-WALLETS.ORG.
The Telegram channel about cryptocurrency and mining Bitcoin, Ethereum, Monero and other altcoins:
-
Wallets for TON. TonKeeper, Tonhub, MyTonWallet, Wallet.TG
Краткий обзор кошельков TON, которые вам необходимы для начала работы с этой новой быстро развивающейся сетью блокчейна! (TonKeeper, Tonhub, MyTonWallet). Кошельки TON разработаны для взаимодействия с реестром блокчейна TON и позволяют пользователям управлять своими активами и совершать транзакции в сети. Кошельки TON упаковывают сложные инструкции в простые щелчки, позволяя любому человеку использовать и исследовать сеть, сохраняя при этом полное владение своими активами в блокчейне.
-

Overview of decentralized crypto platforms Waves
The Waves team is developing tools to create a decentralized technology segment that will become the basis of Web 3.0 – the digital landscape of the future.
-
Review of the best wallets for Litecoin (LTC)
Like Bitcoin, the Litecoin cryptocurrency is rapidly gaining momentum and becoming quite a sought-after digital asset around the world.